
FlexMAM Preview Panel
This page details the ways you can manage your assets with the Preview Panel which appears on the right of the screen when you click on an asset. It also explains how you can enrich your asset usng the tabs in the Summary Panel at the bottom of the Preview Panel.
Preview Player
The Preview Panel features a player for video and audio assets. Here you can review your
assets as well as perform various actions such as name changes, asset download, clipping, commenting, and more.
For a list of valid media formats, consult: Supported File Formats and Object Types.
To edit the name of your asset:
- Hover over and click the asset name field or the
at the top of the Preview Panel.
- Rename your asset as you wish, taking note that the asset name cannot contain the following characters: ‘ “ @ ~ * ^
- Click the checkmark or hit Enter to save your the new asset name.
To expand/collapse preview:
Click on the left of the asset name in the Preview Panel to expand or collapse asset preview. When preview is collapsed the Summary Panel is displayed.
To run custom wizards:
Click at the top right of the Preview Panel to select from custom preconfigured wizards that you can run against your asset.
To use playback controls:
You can use the playback controls to play and pause your video or audio asset, as well as skip and rewind to the previous and next frames.
In addition to using the playback controls, you can also hit the spacebar on your keyboard to play/pause your video, hit "j" to reverse playback, "l" to forward playback. Hit "," or "." on your keyboard to skip the video back/forward by one frame. Hit shift + ← to skip backwards by one second and shift + → to skip ahead.
To view your asset in fullscreen:
- Click
or hit "f" on your keyboard
- Simply click the icon again or hit "f" or "esc" to exit full screen mode.
To preview a text asset:
PDF text assets can be previewed in FlexMAM.
- On the selected PDF text asset, click the preview section on the panel where the preview player would be in a video asset. This will be highlighted on hover.
- This opens a PDF viewer within FlexMAM that will allow you to view, rotate, zoom, and download your PDF.
To create a new clip:
- On your selected video asset, play your video or drag the player slider to where you want your clip to begin.
- Click
or hit "i" on your keyboard.
- Now allow your video to play or drag the slider to the point to where you want your clip to end.
- Click
or hit "o" on your keyboard.
- You can play your selection by clicking
or clear your selection by clicking
.
- If you are happy with your selection, click the
or hit “e” on your keyboard.
- Name your new clip or simply use the auto generated name.
- Click the
or hit Enter on your keyboard.
- Your clip will be created and can be viewed in the Clip Bin under Collections in the left panel. You can learn how to use your Clip Bin to create sequences here.
To adjust playback speed:
- On your selected asset, click the playback speed icon.
- From the menu, you can select to speed up or slow down playback speed.
To add a timeline comment to your video asset:
- On your selected asset, play your video/audio asset or move the player slider to the part you wish to comment on. You can also use the set in
- Click
to the right of the playback controls or hit "c" on your keyboard and comment field will appear.
- In the comment field, enter your comment.
- Click
- You can now see your comment and the timestamp(s) in the comments tab.
To adjust the volume of your audio or video asset:
- Locate the volume icon !
preview player.
- Hovering over
- Alternatively, click the icon to mute
.
Summary Panel
The Summary Panel is located at the bottom of the Preview Panel. It contains a number of tabs that you can use to view and configure your asset metadata, view comments, as well as set and create keyframes.
Managing Asset Metadata
The Metadata tab allows you to add metadata to your assets. This is useful for categorizing content, processing data, and specifying technical information about the asset.
To add and edit metadata:
- Navigate to the Metadata tab by clicking the tab marked with
.
- Here you can fill in the metadata fields relevant to your selected asset.
- Click Save when you are satisfied with your edits.
Adding Metadata Using a Thesaurus
A Thesaurus can be configured in Metadata Designer to create a list of related terms. When you select a term included in a Thesaurus, Dalet FlexMAM suggests additional matching terms that you can add to your metadata. Thesaurus metadata fields can be regular fields or tag fields. See here to learn how to create a Thesaurus in Metadata Designer.
To add metadata with a regular Thesaurus field:
- In a regular Thesaurus field, type in the value you want to add and hit the space bar; a menu of matching terms sorted by relationship is displayed.
- Select the term that is most relevant or use the term you originally typed in.
To add metadata with a tag Thesaurus field:
- In a tag Thesaurus field, click on Search (1) and begin to type your term.
- Once you select the term from the typeahead (or hit Enter); a tag with the term is added below the Search field (2) and the Thesaurus icon,
, is displayed next to the Search field.
- Click the Thesaurus icon; a sliding Thesaurus panel appears on the left of the metadata panel containing a scrollable list of suggestions of related terms from the Thesaurus (3).
- Click the highlighted term or type <enter> again, or click to select the Thesaurus suggestion that you want to use.
- You can also click on an existing tag to open the Thesaurus suggestion panel to choose a term to replace it. In this example, clicking on the conveyance tag displays the Thesaurus panel with suggestions.
Searching Asset Metadata
Clicking the next to the metadata will create a chip in the search filter bar, allowing you to search for items with the same metadata field values.
Viewing Asset Details
Navigate to the Details tab by clicking the tab marked with . This tab displays basic additional details for your selected asset such as date created, asset type, asset owner, asset origin etc. The fields in this tab are fixed and cannot be changed and most of the information in them is read-only.

Changing Asset Type
It is possible to change an Asset/Object Type from the Details tab in the Summary Panel/Manage Page. This is available for any object that supports variants.
To change the asset type
Click in the Type field, a dialog opens to select a new Type and a Metadata Schema for the new type.


If you change the type, the underlying metadata instance is replaced and ALL metadata values are removed from the asset. You cannot undo this operation.
Enabling Recommendations for Content
To facilitate your work, FlexMAM displays recommendations for similar content when you select an asset in the Search listing. Recommendations are based on asset tags, which you manage in the Details tab of an asset.

To add a tag to an asset, type in the value. If the tag already exists in the tag collection, you will be prompted to select it from the drop-down list.
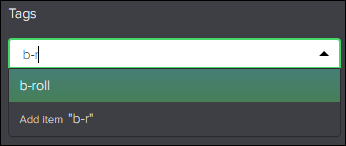
If the tag does not exist, type in the value you want to add and click Enter; the new tag is added to the tag collection.


You enable recommendations from the FlexMAM table settings menu.

Add tags to your assets to improve the recommendations of related material. FlexMAM searches for content that has closely matching tags and displays the most relevant items in the Recommendations panel at the bottom of the screen.

Click on one of the Recommendations to open it in the Manage page. You can hide/show the Recommendations panel using ![]() . Clicking on
. Clicking on ![]() disables recommendations.
disables recommendations.
Viewing Technical Metadata
Navigate to the Technical Metadata tab by clicking the icon . This tab contains technical metadata about the file associated to the asset. It displays the file, format, video stream and audio stream information. These details cannot be edited.
Managing Asset Comments
Comments can be posted against the entire media asset, as well as against a specific point or time range within a video asset. Learn how to add a timeline comment here.
Navigate to the comments tab by clicking the tab marked with .
Here, you can view comments you and other users have left about the selected asset.
To view and manage asset comments:
- Clicking on an existing comment will skip to the point or highlight the section of the video asset that the comments are relevant to.
- Play the section the comment was applied against by clicking the
- Edit your comments by clicking the
to save your changes, or
to cancel.
- Delete your comments by clicking the
which appears on hover.
Viewing Asset Relationships
In the Relationships tab , you can see the different relationships belonging to your selected asset.
Asset Children
This tab displays assets derived from the selected (parent) asset. Hover over an asset child to see the following icons:
-
- click this icon to perform a custom preconfigured wizard on the selected child asset.
-
- click this icon to download the selected child asset.
-
- click this icon to see a drop down menu of actions (Add to Clip Bin, add to Collection, Copy, Move, etc.) that can be performed on the selected child asset.
You can double click a child to reveal a full view of it and see its details.
Asset Memberships
In this tab, you’ll see a list of the objects, e.g. a UDO, Group, Collection that this asset belongs to. You can click the that appears on hover to go to the parent object and view its other assets.
Managing Asset Access Permissions
In the Access tab , you can see a list of which Users or Groups have access to your selected asset, and the roles of these users and groups. Users with the correct permissions will also be able to grant user or user groups access to an asset.
To manage access for an asset:
- In the right summary panel, click on the Access tab
.
- In the tab, click the
icon.
- This will open the Share with people and groups pop up.
- In the window, you can search for the name of a user or group you want to share your asset with. You can toggle between individual users or groups from the icons to the left of the search bar.
- You can search for and add different users and groups and configure the level of access they have to your collection.
- From the drop down menu, you can select Off, View, or Modify.
- Off: your collection is not shared with this user or group.
- View: your collection can be viewed by this user or group but they cannot edit it.
- Modify: your collection can be edited by this user or group. - Once you are happy with you settings, click Share.
Viewing Custom Markers
Custom markers mark events at specific times in a video asset. You can view markers for your selected asset in the Custom Markers tab by clicking the tab marked with in the Summary Panel, but you must go to the Manage Page to add custom markers.
Selecting a marker range in the table highlights it in the player, and you can use the green playback button to play the range.
Clicking on a marker in your search results list in Markers View opens the preview panel for the relevant asset and loads the Custom Markers tab to display the selected marker. When Markers View is selected in the Asset table, the Single Mode/Multiple Mode button is displayed in the Custom Markers tab and you can easily toggle between the selected marker and the list of all markers belonging to the asset.
When the button is green (single mode), the marker selected in the Marker Results table is displayed in the Custom Markers tab.
When the button is white (multiple), all markers for the asset are displayed in the Custom Markers tab.
To use table templates when viewing custom markers:
- Use the template selection bar to select and apply your desired template
- Use the table column headers to search and filter your markers.
- Learn how to create markers templates here
You can perform a number of actions on custom markers using the icons that are displayed when you hover your mouse over them.
|
Use this icon |
To do this |
|
|
Edit the range of the cutom marker and its metadata |
|
|
Run a wizard on the custom marker |
|
Perform an Action on a custom marker: Add to Clipbin (or other Collection), Manage Collection (set the collection clips are added to) , Play, Delete |
Managing Keyframes
Navigate to the keyframe tab by clicking the tab marked with .

The Keyframes tab shows keyframes associated with the asset. In this tab, you can manage the keyframes of your selected asset:
- Upload a keyframe from an external file
- Extract a keyframe from an asset in FlexMAM
- Set a master keyframe for an asset in Tile view
- Add details to a keyframe
- Delete a keyframe
To upload a keyframe:
- Click
at the top right corner of the keyframe tab.
- In the Upload keyframe dialog, either drag and drop an image or click to upload an image. You can only upload one keyframe at a time.
- Once you have selected an image, you can add a Title and Description and set whether the keyframe is used as the Master keyframe. By default, the file name is used as the name of the keyframe.

- Click Upload; the uploaded keyframe appears in the Keyframetab.
To extract a keyframe:
- On your selected asset, move the player slider to the frame you wish to extract.
- Click the
 icon.
icon. - You can give your keyframe a Title and Description by clicking on the respective fields and editing as desired.
- Click Save.
Working with keyframes
Hover over a keyframe to display its description and a set of available action icons.
- Set master keyframe: Sets the keyframe as the master keyframe, this is indicated by a green tick on the keyframe
- Download keyframe: Downloads the keyframe and uses the name as the file name
-
Open details: Opens a modal that display a large keyframe image with additional details and action commands. You can edit the additional details in this view using the icon. In the Details modal, the asset keyframes are displayed in a dynamic Carousel.
- Delete keyframe: Deletes the keyframe
If an asset has many keyframes, use the pagination to navigate between the pages, up to 24 keyframes can be displayed on each page. Use the Sort by icon to sort keyframes in ascending/descending timecode order.

Viewing Asset History
In the History tab, you can view the history of an asset by most recent activity, i.e. changes and actions applied to the asset, the user that made these changes, and when they were made.
Comments
1 comment
Hello DocTeam,
Could you add the supported format/resolution for the preview player in this article please.
Please sign in to leave a comment.