
FlexXTEND Configuration
Introduction
FlexXTEND Adobe Panel is a microservice application designed to provide HTML pages into Adobe Premiere Pro. It allows end user to browse, search, preview and use media from the Flex system in their Premiere projects compositions and save the compositions back to Flex. More advanced capabilities include the upload of local media to the Flex system, saving Adobe Projects to Flex for ongoing work and rendering media on a remote AME machine. The FlexXTEND panel is run from Adobe Premiere and is an extension of the Flex system.
For the installation, read the article: Dalet Flex Xtend Installation.
For using Dalet Flex Xtend, read the article: FlexXTEND User Guide.
This is a step-by-step guide for configuring Dalet Flex Xtend.
Prerequisites
There are certain prerequisites for working with Dalet FlexXtend.
Flex Side Configuration
Setting up the panel in Adobe Premiere Pro includes the following fields whose values are taken from the configurations in the associated Dalet Flex account:
- Metadata Definition ID for Sequence Render and Export/Project check-in
- Folder Resource ID for Media Check-in
- Storage Resource ID for Project check-in/FCPXML import
- Storage Resource Path for Media Check-in to Shared Storage
- Workflow Definition ID for Sequence Render and Export/Media Check-in/Project check-in (Save as/Save)
- Import Action ID for Media Check-in/Project check-in/FCPXML import
- Variants for assets being created in Dalet Flex
- Workspace ID
EPR files
An *.EPR file contains system presets for Adobe Media Encoder. Some hi-res formats require the one-time generation of an *.EPR file to ensure correct encoding of that format.
EPR files are created in Adobe Media Encoder, using the Preset Browser or from the Export tab of Adobe Premiere. Created presets can be exported to external EPR files for future import. For more information on the Preset Browser operations, see Adobe Documentation.
The location of the Flex related EPR files is configured in the Sequence - Render and Export and in the Media check in section below. These are mandatory fields. You must have a valid EPR file available to your installation of FlexXtend.
Login and Panel Setup
Once you have successfully installed the FlexXTEND Adobe Panel you can follow the steps below to set up the panel.
To open the panel, launch Adobe Premiere Pro and create a new project or load an existing one.
Go to Window > Extensions > FlexXTEND.
The FlexXTEND panel will pop up.
Panel Configuration
The panel prompts you to select or create a new environment.
Click the Plus (+) icon to create a new environment or select an existing environment from the dropdown list.
When creating a new environment, fill in the following fields:
Environment name: Give your environment a name.
Panel Service URL: This is the URL for the server-side component of the panel. The FlexXTEND panel communicates with this service in the backend. This service needs to be installed inside the Flex environment.
Click Load.
Remember FlexXtend login approval for 24 hours
Login approval to FlexXtend can be remembered for 24 hours. When Consul KV flex/shared/featureToggles/allowToRememberXtendScopeApproval = true, the Remember me for 24 hours checkbox is displayed in the login screen and all new logins in the 24-hour period will be logged in directly without the need for manual approval in the Browser.
FlexXTEND Settings
On first connection to an environment, fill in and configure the following fields in the FlexXTEND Settings. These can be changed at any time by clicking on the Settings icon in the User Profile.
See FlexXTEND User Guide for more information.
NOTE: All text fields are mandatory unless otherwise noted in this article. If you do not fill out a mandatory field, the Save Settings button is disabled and a red warning message is displayed by the empty field.
The settings are saved to the flexXtendAdobePanelSettings.json file at C:\Users\<USER>\Documents\AdobeFiles\. To apply configurations from other FlexXtend environments, import this .json file to this location.
Disable the Settings Option in the User Profile
;"To prevent users being able to change the settings in the FlexXtend panel, use the <;>"showSettingsButton" flag;" in the flexXtendAdobePanelSettings.json configuration file.
;"Edit the file manually to change the setting.
<;>"showSettingsButton": true - Settings option
is displayed
;"
<;>"showSettingsButton": false - Settings option is hidden
FlexXtend Versions
Scroll down to the bottom of the FlexXtend panel to see the current versions being used by FlexXtend.
| Parameter | Description |
| Premiere Extension Version | This is the version of the flex-xtendadobepanel-extension.zxp installed on the Premiere machine. |
| Panel App Version | This is the version of the flex_xtendadobepanel_app microservice installed on the Dalet Flex environment |
Settings View
Dalet FlexXtend can connect to multiple Dalet Flex environments. Select the environment to connect to from the drop down list. The environment you choose is selected in the FlexXtend login panel.
To streamline the login process to FlexXtend, you can disable the environment selection prompt, so that you always log in to the same environment. Select the Always Use This Environment checkbox to force FlexXtend to connect to the selected environment on subsequent logins. To redisplay the prompt, unselect the Always Use This Environment checkbox and the prompt is displayed on the next login.
General
Enter the general settings, as detailed below.
| Parameter | Description |
| Environment name: | The environment name as entered above. |
| FlexXTEND Service URL | The panel service URL as entered above; this is the URL to the Flex environment the panel works with (it uses this to make API calls to Flex). |
| Preview Auto-Play | Start playing automatically when preview is triggered (double click on an asset). |
| Proxy Mode |
When this checkbox is selected and the asset has an MP4 proxy, this file is imported to Adobe Premiere instead of the high res asset. The whole mp4 media is downloaded for use. For assets with MPD proxy, .dlt json files containing reference information for the high res and MPD proxy are always written. The parts of the media used in a project are cached on disk together with handles. See below for more details. NOTE: In proxy mode, if there is no proxy file available, the high res version of the asset is imported. |
| Use DLTs Even in High Resolution Mode | When this checkbox is selected, a .dlt file is generated for the high res media and the high res media is streamed to the Timeline by daletPremiereImporter as required instead of downloading the whole file. |
| On import, ignore project with same name if exists on local storage | Do not import a project if one with the same name already exists on local storage. |
| Media Files - Shared Storage Path | Before importing files from Dalet Flex, FlexXtend checks this location to see if the file already exists there. If it exists, it does not download the file to the local storage path, but uses the instance in the shared location. Dalet Flex and Adobe Premiere must have access to this shared storage location and it can be accessible to multiple users to save on download resources. |
| Media Files – Local Storage Path |
The local storage location that assets imported from Dalet Flex are downloaded to. Before importing files from Dalet Flex, FlexXtend checks this location to see if the file already exists there. If it exists, it does not download the file again, but uses the instance in this location. NOTE: When importing high res files with MPD proxies, .dlt json files containing reference information for the high res and MPD proxy are written to this location , the files themselves are not downloaded but they maybe cached on disk while working. |
| Workspace ID (optional) | This is the ID of the Flex workspace you are working in. If this field is left blank, all workflows will be triggered on the default workspace in Flex. If you enter a specific Workspace ID, then all workflows will be triggered in that workspace in Flex. |
| Flex Comments to Import as Markers | To improve synchronization between Dalet Flex and Adobe Premiere, you can import comments added in Dalet Flex as markers in Adobe Premiere. Select which comments to import, FlexREVIEW Comments or FlexMAM and FlexREVIEW Comments. The last 500 annotations on the asset are imported. Select None to not import Comments. The default setting is FlexREVIEW Comments. |
| Flex Comment Marker Colour | Set the color of the markers created from Comments in Adobe Premiere. The default color is green. |
Use proxy media for high res DLT
When working in Proxy mode, Adobe must get a high-res reference, with the high-res expected frame size, to generate a valid sequence. When a DLT file is imported into Adobe Premiere, the associated proxy file with "real" video is used and scaled to the dimensions of the hi-res media. This allows FlexXtend to import growing files since the duration of the high-res file will not be static but will grow as the proxy grows.
The variable ProxySourceReference, that points to the proxy URL of the high-res file, is added to the Dummy DLT generated for the high-res version of the imported media. When the variable exists, daletPremiereImporter reads the frames from the given proxy URL and provides them to Adobe as if they were high resolution together with the width, height and audio of the media. By default, this flag is set to true, to disable manually add useProxyReferenceInHighResDlt=false in the flexXtendAdobePanelSettings.json configuration file.
Sequence – Render and Export
Enter the rendering and export settings, for rendering a new sequence and importing to Flex.
| Parameter | Description |
| Automatically trigger partial checkin | If selected, FlexXtend triggers partial check in automatically whenever a sequence is rendered for export. See FlexXTEND User Guide for more information. |
| Export Selection - Entire sequence | Exports the entire sequence. This is the default setting. |
| Export Selection - Sequence In/Out | Exports the section of the sequence marked with In/Out. |
| Export Selection - Work Area | Exports the section of the sequence in your Premiere Pro Work Area. |
| Export Preset (EPR) Path | The path to the Export preset file storing customized settings used by Adobe Media Encoder when encoding and exporting video. This preset file MUST be created as a prerequisite for working with FlexXtend. |
| Export Storage Path | The location which rendered sequences are exported to on the local computer. If upload to S3 is selected, the file is also uploaded to the S3 storage bucket. |
| Variant Name (optional) | The name of the asset type variant which will be associated to this media. The variant is created in Dalet Flex. If no variant is supplied, the default variant for the media type is used. |
| Metadata Definition ID | The metadata definition to show in the Export screen of the Panel. Metadata entered in this screen is imported with the asset to Dalet Flex. The metadata definition is created in Dalet Flex. |
| Workflow Definition ID |
The workflow that the Flex Panel launches after Adobe Media Encoder completes the render of your sequence to create a new file. This workflow runs when you select Export > Render in the FlexXTEND panel and imports your file to Dalet Flex. If no workflow ID is entered here, then no workflow will be triggered, and your file will only be saved locally. |
|
Enable Remote Media Encoding: |
When enabled, render jobs are sent to a remote AME, assigning the actual render to a dedicated AME server. If enabled the Export Storage Path above is ignored and the file is written to the storage path in the flexXtendAmePanelConfig json file. |
| Auto Select Media Encoding | Select this checkbox to enable automatic selection of remote AME based on real-time load and availability of the AME machines. If selected, the Auto AME Selection check box is selected when you open the Export tab in FlexXtend and one of the AME machines associated to your Adobe Premiere client machine is automatically assigned based on its load. |
| Remote Media Encoding - Label: | Add a label to the remote AME instance. |
| Remote Media Encoding - URL: | Add the URL to connect to the remote AME instance |
| Upload Rendered Sequence to S3: | You can select whether to upload your rendered sequence to S3/S3 Compatible storage. Checking the box will prompt you to fill in your S3 Key, S3 Secret, Bucket Name and Path (optional). |
| Compatible URL | If uploading to S3 Compatible storage, add the URL to the compatible storage. |
Media Check-In
This section handles the upload of local media used in a project, to the Dalet Flex system. Media Check-In creates an asset in Dalet Flex and the media is available via Flex for continued editing or future projects.
NOTE: Apart from the Check in Format EPR, it is not mandatory to fill in the fields in this section. If they are not filled in, local media will not be uploaded to Dalet Flex.
| Parameter | Description |
| Always Check in using Mezzanine Format | Select this option to always perform "check in" using the mezzanine format, regardless of whether the media in the Timeline has been cropped or not. In this case, when you click Generate & Replace in the Export/Save As/Save tabs, a new file is generated locally and added to the Media Bin in Premiere. This file can then be checked in to Dalet Flex, in the same way as with partial check-in. |
| Automatically trigger partial checkin | If selected, FlexXtend triggers partial check-in automatically whenever Media check-in is performed. See FlexXTEND User Guide for more information. |
| Check in Format EPR (mandatory) | The path to the Check in preset file storing customized settings used by Adobe Media Encoder when performing full check-in using a mezzanine format and when performing partial check-in. This preset file MUST be created as a prerequisite for working with FlexXtend. |
| Variant Name | The name of the asset type variant which will be associated to this media. The variant is created in Dalet Flex. If no variant is supplied, the default variant for the media type is used. |
| Workflow Definition ID | The workflow that the Flex Panel launches after importing the local media. If no ID is provided, the media is imported using the configured Import Action ID and no workflow is performed on the imported media. |
| Import Action ID |
Enter the import action ID, for local media upload, as configured in Flex Core. NOTE: This must be a dedicated Media Check-In Import Action for Xtend local media import. See Import Actions Mandatory Configuration below for configuration details. |
| Save Media File to |
The location the file is saved to. Choose between an S3 bucket or a shared UNC/local drive location. For AWS: Add the Folder Resource ID See Import Actions Mandatory Configuration below for configuration details. |
Partial Check-In
By default, when performing media check-in, FlexXtend checks in the entire media file in the Premiere Bin to Dalet Flex regardless of how much material is used in the sequence in the Project. To save resources (storage/processing time) you can perform partial check-in that generates clips to check in using only the portion of media in use on the Timeline (together with predefined handles.) See FlexXTEND User Guide for more information.
NOTE: To support partial check-in, Adobe Media Encoder (AME) must be installed on the Adobe Premiere client machine. The partial check in clip rendering is done by the local AME that is running on the editor’s machine.
This section sets the configurations for Partial Media Check-in to the Dalet Flex system.
| Parameter | Description |
| Handle Size (seconds) | Duration of the additional media to the left and right of the subclips used in the timeline that is added to the generated clip. |
| Generate each clip as an independent file | If selected, FlexXtend generates each clip in the Timeline as an independent shot and does not consolidate them. |
| Only generate the file(s) if the portion being used is less than this percentage (0-100) of the original files |
Set the maximum percentage of the original file used for which partial check-in is performed. If the size is greater than the defined percentage, partial check-in is not performed and no new files are generated. If the duration of the file to be generated is within 1 second of the original file's duration, the file will not be generated and the original file is uploaded to Dalet Flex. |
| Suffix for Bin containing generated files (appended to current time) (optional) | Set the suffix for the Bin that generated clips are placed in in the Premiere Media Bin. The name of the Bin is the current time with this suffix. |
| Target folder for generated files | The location that generated files are stored in on the local computer. |
| Extension of generated files | The file extension of the generated files. The file extension must match the format used to create the EPR in Adobe Premiere. |
| Jobs polling period (ms) | Set the rate in ms for checking render jobs on AME triggered for partial check in. System configuration, should only be changed by a system administrator. |
| Generated files polling period (ms) | Set the rate in ms for checking files generated locally by AME for partial check in. System configuration, should only be changed by a system administrator. |
| File generation Preset (EPR) path | The path to the Export preset file storing customized settings used by Adobe Media Encoder when generating the files. |
| Remove from AME queue after generating files | If selected, the source clips are removed from the AME after the new files have been generated. |
Project Check-In
This section handles the import of an Adobe Project to the Flex system. The Adobe project file (*.PRPROJ) is imported as an asset in the Flex system for future use and further editing. NOTE: Any local media used in a project is automatically uploaded to Flex when you save the project so it is available for different users working on different workstations.
NOTE: It is not mandatory to fill in the fields in this section. If they are not filled in, you cannot import and save projects to Dalet Flex.
| Parameter | Description |
| Automatically trigger partial checkin | If selected, FlexXtend triggers partial check in automatically whenever Media check-in is performed. See FlexXTEND User Guide for more information. |
| Variant Name: | The name of the asset type variant which will be associated to this project. The variant is created in Dalet Flex. If no variant is supplied, the default variant for projects is used. |
| Metadata Definition ID: | The metadata definition to show in the Save As screen of the Panel. Metadata entered in this screen is imported with the asset to Dalet Flex. The metadata definition is created in Dalet Flex. |
| Import Action ID: |
Enter the import action ID used to import the *. PRPROJ file, as configured in the Flex Core. NOTE: This must be a dedicated Adobe Project Import Action for Xtend project import. See Import Actions Mandatory Configuration below for configuration details. |
| Save as Workflow Definition Id | The workflow that the Flex Panel launches after importing the .PRPROJ to Dalet Flex. This workflow runs when you select Save As > Export Project in the FlexXTEND panel. This workflow id is optional. If no ID is provided the new project is imported using the configured Import Action ID and no workflow is performed on the imported asset. |
| Save Workflow Definition Id |
The workflow that launches after updating an existing project and importing the changes to Dalet Flex. This workflow runs when you select Save > Save Project in the FlexXTEND panel. This workflow runs when you select Save > Save Project in the FlexXTEND panel. |
| Save Project File to: |
The location the file is saved to. Choose between an S3 bucket or a shared UNC/local drive location. For AWS: Add the Storage Resource ID For Shared Storage: Add the Storage Resource ID and the Storage Resource Path. |
| Support Project Locking |
Locks projects imported to Adobe Premiere through FlexXtend to prevent modifications by other users while a project is already being edited. See FlexXTEND User Guide for more information. |
| Enable render for locked projects | When Project Locking is enabled and the project you are working on is locked by a second user, you cannot render the project. Select this checkbox, to enable rendering a locked project. This option is only enabled when Support Project Locking is selected. |
| Save Project On Render |
Automatically saves a project to Dalet Flex before rendering the project. This ensures that every asset registered in Dalet Flex has a Project asset saved in Dalet Flex as well. See FlexXTEND User Guide for more information. |
| Remove unused media from saved project | When this option is selected, local media in the Media Bin in Premiere that is not used on the timeline is removed from the project before saving it to Dalet Flex. |
FCPXML import
This section handles the import of Flex Edit assets for each sequence in the project and the import of a Project XML (FCPXML file type) for the whole project. These are created when you click Save As > Export Project or Save > Save Project in FlexXtend.
| Parameter | Description |
| Create Flex Edits | Export all sequences in the project as individual .xml files. These are imported to Dalet Flex as Flex Edit assets. |
| Create Project XML |
Create an FCPXML .xml project file for the complete project. This is imported when you import a new or existing project to Dalet Flex (from the Save AS/Save tabs). NOTE: If Import Referenced Sources is set to Yes in the Overwrite Project Import Action used in your workflow when saving the project, you MUST select the Create Project XML checkbox to create an XML for the whole project. If you do not select this checkbox the import action will fail. See Import Actions Mandatory Configuration below for configuration details.
|
| Variant Name: | The name of the asset type variant which will be associated to the Flex Edit assets created from the sequences in the Project. The variant is created in Dalet Flex. If no variant is supplied, the default variant for projects is used. |
| Import Action ID: |
If Flex Edits/Project XML creation is enabled, enter the import action ID, for sequence import using the Import Edit plugin as configured in Flex Core. NOTE: This must be a dedicated Flex Edits Import Action for Xtend sequence import. See Import Actions Mandatory Configuration below for configuration details. |
| Export FCPXML To: |
The location that Flex Edit xml files and Project xml files are saved to. Choose between an S3 bucket or a shared UNC/local drive location. For AWS: Add the Storage Resource ID For Shared Storage: Add the Storage Resource ID and the Storage Resource Path. NOTE: If Import Referenced Sources is set to Yes in the Overwrite Project Import Action used in your workflow when saving the project, the location MUST be the same as the location that the .prproj file is saved in as set in the Project Check-in section. |
Import Actions Mandatory Configuration
To import media and Adobe Premier projects to Dalet Flex, the correct Import Actions must be created on the Flex admin side. For Media Check-in/Project Creation/Flex Edit Import/FCPXML Import, these import actions are used directly, for Project Overwrite, the import action must be used in the Save Workflow.
The Import actions are configured in Flex Core under Settings > Actions.
Media Check-In Import Action
To import local media used in projects in Adobe Premiere to Dalet Flex, create an Asset Import action to perform Media Check-In.
Create a new Import action with Plugin Type: Import and Plugin: Asset Import.
Note the Import Action ID under Details, it is used in the Media Check-In section of the FlexXTEND panel configuration.
Under Configuration, set the exact expressions as described in the table below. The additional settings depend on the specific scenario.
| Field | Value |
| Source Resource | #{job.variables.variableHashMap['resource'].id} OR set a fixed Folder Resource in Dalet Flex as the Source Resource |
| Item Name | #{job.variables.variableHashMap['resourceItemName']} |
| Original Filename | ${variables.externalFileName} |
| Title | #{job.variables.variableHashMap['resourceItemName']} |
| Asset Origin | Import |
| Variant | #{job.variables.variableHashMap['variant']} mandatory to use the variant configured in FlexXtend panel |
Adobe Project Import Action
To import projects created in Adobe Premiere to Dalet Flex, create an Adobe Project import action.
Create a new Import action with Plugin Type: Import and Plugin: Import Project.
Note the Import Action ID under Details, as it is needed for the FlexXTEND panel configuration.
Under Configuration, set the exact expressions as highlighted in the table below. The additional settings depend on the specific scenario.
| Field | Value |
| Source Resource | #{job.variables.variableHashMap['resource'].id} |
| Item Name | #{job.variables.variableHashMap['resourceItemName']} |
| Title | #{job.variables.variableHashMap['resourceItemName']} You can add an optional suffix to this expression, eg - Adobe Project |
Overwrite Project Import Action
To update existing projects imported from Dalet Flex after editing them in Adobe Premiere, create an Overwrite Project import action.
NOTE: This action MUST be used as a node in the Save Workflow that is used to import the changes to an existing project in Dalet Flex and that launches when you select Save > Save Project in the FlexXTEND panel.
Create a new Import action with Plugin Type: Import and Plugin: Import Project.
Under Configuration, set the exact expressions as described in the table below.
| Field | Value |
| Source Resource | #{job.variables.variableHashMap['resource'].id} |
| File Name | #{job.variables.variableHashMap['resourceItemName']} |
| Title | #{variables.resourceItemName} |
If you set Import Referenced Sources to yes, you must use the following expression in the Edit File Name field and you must select the Create Project XML checkbox in the Import FCPXML section of the FlexXtend settings dialog.
| Field | Value |
| Import Referenced Sources | Yes |
| Edit File Name | #{variables.fcpXmlProjectFileName} mandatory if Import Referenced Sources is Yes. |
| Reconcile Referenced Sources | Yes/No |
Flex Edits Import Action
To import the Adobe Sequences used in projects in Adobe Premiere/import a Project XML file to Dalet Flex, create an Import Edit action to create Flex Edit assets.
Create a new Import action with Plugin Type: Import and Plugin: Import Edit.
Note the Import Action ID under Details, as it is needed for the FlexXTEND panel configuration.
Under Configuration, it is highly recommended (though not strictly mandatory) to set the exact expressions as described below.
| Field | Value |
| Source Resource | #{job.variables.variableHashMap['resource'].id} |
| File Name | #{job.variables.variableHashMap['resourceItemName']} |
| Title | #{job.variables.variableHashMap['resourceItemName']} |
| Parent Project | #{job.variables.variableHashMap['parentProject'].id} |
| Import Referenced Sources | Yes/No |
| Reconcile Referenced Sources | Yes/No |
| Create Placeholders | Yes/No |
AME Remote Rendering
Remote encoding, or remote rendering, allows Adobe Premiere users to send the render jobs to a central rendering server, instead of launching a local Adobe Media Encoder instance and rendering locally.
When configured, rendering jobs by FlexXTEND users are directed to the central AME server for rendering.
The AME will output the rendered asset into the "exportPath" location configured in the AME JSON, and will optionally also upload to the S3 location specified in the Premiere user's configuration. The premiere user does not have to specify an S3 bucket for upload.
Versions and Notes
- The Adobe Media Encoder version must match the Premiere version.
- Remote AME is supported for Windows only.
Installation and Configuration
Install the Xtend to AME extension in the same way it is installed on Premiere machines above.
To support monitoring jobs on the Remote Adobe Media Encoder, AME must be installed in https mode - mandatory from Dalet Flex 2025.9.0.
See Adobe Documentation and this Internal article Dalet Flex Xtend Installation for more information.
Once installed, the configuration of the remote AME instance is done directly in the flexXtendAmePanelConfig.json file. There is no graphic user interface for configuration, as there is for the FlexXTEND extension.
The flexXtendAmePanelConfig.json file is located at C:\Users\<USER>\Documents\AdobeFiles\.
Edit the file and add the following parameters:
- Flex environment URL, followed by /flexxtendamepanel
- AME port, this port is needed in the Xtend Premiere configuration, by default: 8007. The supported range of ports is from 8007 and above
- Shared storage path, accessible by the Flex system
- Export path, the path for exported files and optionally upload to the S3 location specified in the Premiere user's configuration
- Download path, the path for downloaded files
Example:
  {

  "amePanelUrl": "https://documentation.flex.dalet.com/flexxtendamepanel/",

  "ameNodeServicePort": 8007,

  "sharedStoragePaths": ["\\AME_Storage\amepanel\AMELocal"],

  "exportPath": "\\AME_Storage\amepanel\AME Export",

  "downloadPath": "\\AME_Storage\amepanel\AMEDownload"

  }
Importing FCPXML via FlexXtend
You may want to work on projects in Adobe Premiere that were originally created as an FCPXML file in a different NLE. FCPXML files imported into Dalet Flex will be created as a .prproj Project asset in Dalet Flex with the FCPXML associated as a member asset.
You can use FlexXtend to import these projects and all the information in the FCPXML will be imported to Adobe Premiere.
Pre-conditions to support this functionality:
- The media referenced in the FCPXML must have an MPD proxy associated with it
-
The prproj file name must include
“ASSET_TO_IMPORT_AS_FCPXML”eg myFlexAsset_ASSET_TO_IMPORT_AS_FCPXML_7539434.prproj -
The xml/media element, MUST contain an
<assetid>subElement containing the Flex Asset id that references the given media
Issue Reporting
When reporting any issues discovered when working with FlexXtend please include the following information.
Environment name
Flex version
Premiere Extension Version
AME Extension Version (if relevant)
Panel App Version
Detailed description of the scenario
Console logs - use the Save As option to create a text file, do not Copy+Paste because this results in information loss.
Create a har file - From the Network tab, download a recording of all activity on your browser and save it as a har file.
Comments
3 comments
Thanks Nisan - just checking - would you be able to indicate the paths for MacOS too ?
The settings are saved to the
flexXtendAdobePanelSettings.json fileatC:\Users\<USER>\Documents\AdobeFiles\. To apply configurations from other FlexXtend environments, import this .json file to this location.Thanks !
Steven Luong I just want to make sure, the path you indicated is for Windows, right. Since we do not have a Mac in our team, we will need to find out (unless you can tell us). Something like: /Users/<Name>/Library?
Hi Benjamin, thanks for the follow up - I could actually find all the files/folders on a mac :
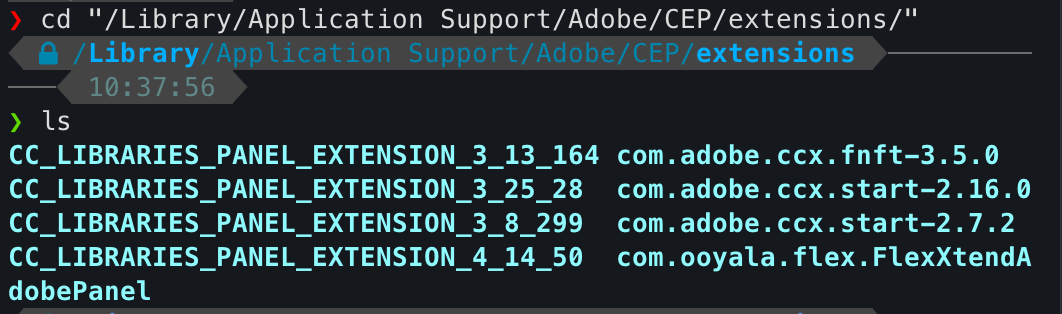 - json is installed here : ~/Documents/AdobeFiles/ (= /Users/stevenluong/Documents/AdobeFiles)
- ZXP content is installed here : /Library/Application Support/Adobe/CEP/extensions/
I hope this helps,
Thanks !
Please sign in to leave a comment.